
Custom Furniture Workshop Setup | Factory Direct China Supplier for Sale
Most buyers start by browsing machine catalogs. That is backwards. The correct sequence for a custom furniture workshop setup is: define your product mix, lock your daily panel throughput, then reverse-engineer the equipment list and floor plan from those two constraints.
A functional custom furniture workshop setup requires a matched production line — not a pile of standalone machines — where the CNC nesting center, edge bander, and multi-boring machine are balanced to the same hourly节拍, sized to your panel type (MDF, particleboard, melamine), and pre-configured for your local voltage and control language before leaving the factory floor.
I still remember a container that landed in Veracruz with a full cabinet line inside. The machines ran, the motors spun, but the PLC screens were locked in Mandarin and the voltage tag read 380V/50Hz while the plant grid was 220V/60Hz. The client could not even read the error codes. We flew a technician out, swapped transformers, reflashed the HMI, and lost nearly a month of production. That kind of mistake does not show up in a brochure — it shows up on your P&L. [NEED_CITE: common voltage and control-interface mismatches in imported industrial machinery]
Getting the custom furniture workshop setup right the first time is about matching machines to workflow, not to wish lists. Below is how I walk buyers through that process.
What Machines Do You Actually Need for a Custom Furniture Workshop?
The equipment list is dictated by your product category — cabinets, wardrobes, or doors — and almost never by the "full catalog" approach. A cabinet-focused shop and a door-focused shop share maybe half their machinery; the rest is category-specific.
Here is a typical configuration matrix I use when buyers describe their product mix:
| Product Focus | Core Machines | Optional Add-ons | Automation Tier |
|---|---|---|---|
| Kitchen Cabinets (panel-based) | CNC nesting center, automatic edge bander with pre-milling, multi-row boring machine | Beam saw for batch ripping, corner rounding station | Mid-to-High |
| Wardrobes & Sliding Doors | CNC nesting center, PUR hot-melt edge bander, six-row boring machine | Vacuum membrane press for wrapped profiles, dowel inserter | Mid |
| Wood & Composite Doors | Sliding table saw or beam saw, double-end tenoner, wide-belt sander | CNC door engraving center, lock-hinge drilling unit | Varies |
| Startup / Low-Volume Shop | Semi-automatic edge bander, small-format CNC router (1325 area), manual multi-boring machine | Sliding table saw, portable dust collection | Entry |
A small cabinet workshop in Southeast Asia came to us wanting a "complete line" after seeing a trade-show video. Their actual daily volume was roughly a few dozen cabinets. We steered them away from a fully automatic edge bander with pre-milling and toward a semi-automatic straight-line model paired with a 1325 CNC router. The capital outlay dropped noticeably, and their payback period shortened because the machine utilization rate stayed high. [NEED_CITE: equipment utilization benchmarks for small-scale panel furniture workshops]
The mistake I see repeatedly is buying the top-spec edge bander "just in case" — then running it at a fraction of its feed speed because the CNC nesting center upstream cannot feed panels fast enough. In a custom furniture workshop setup, every machine must be sized to the bottleneck, not to the catalog maximum.
How to Match Equipment Capacity with Your Daily Output Target?
Line balancing — not individual machine speed — determines your real throughput. If your CNC nesting center outputs a certain number of panels per shift but your edge bander runs at a noticeably slower feed rate, panels queue up, WIP inventory builds, and your floor space fills with half-finished work.
The method I apply is straightforward:
- Calculate panel demand per shift. Count total panels across all typical orders — cabinet sides, shelves, doors, backs — and divide by available working hours.
- Size the CNC nesting center first. Nesting efficiency depends on sheet utilization rate, tool-change time, and vacuum zone layout. A machine with ATC and dual-table capability will cycle faster on mixed orders than a single-spindle model. [NEED_CITE: nesting efficiency factors in panel furniture CNC operations]
- Match edge bander feed speed to nesting output. If the nesting center delivers panels at a rate requiring continuous edge processing, the edge bander’s working feed speed — including pre-milling, trimming, and buffing cycles — must equal or exceed that rate.
- Align boring machine capacity. A six-row boring machine handles standard cabinet drilling patterns in a single pass; a twenty-three-spindle model covers wider panels. Choose based on your maximum panel width and hole-pattern complexity.
- Verify auxiliary throughput. Dust collection capacity, compressor air volume, and conveyor length all affect whether the line actually runs at rated speed.
A mid-scale wardrobe manufacturer in Latin America was running a single-shift output well below their target. Their edge bander was rated for high-speed feed, but the boring machine downstream required two passes per panel because its spindle configuration could not cover the full drill pattern in one setup. Adding a second boring station — rather than upgrading the edge bander — resolved the bottleneck at a fraction of the cost.
The key insight: in any custom furniture workshop setup, the slowest matched stage defines your ceiling. Overspending on a fast machine upstream of a slow one is one of the most common capital-allocation errors I see.
What Layout Mistakes Cost Workshops Thousands in Rework?
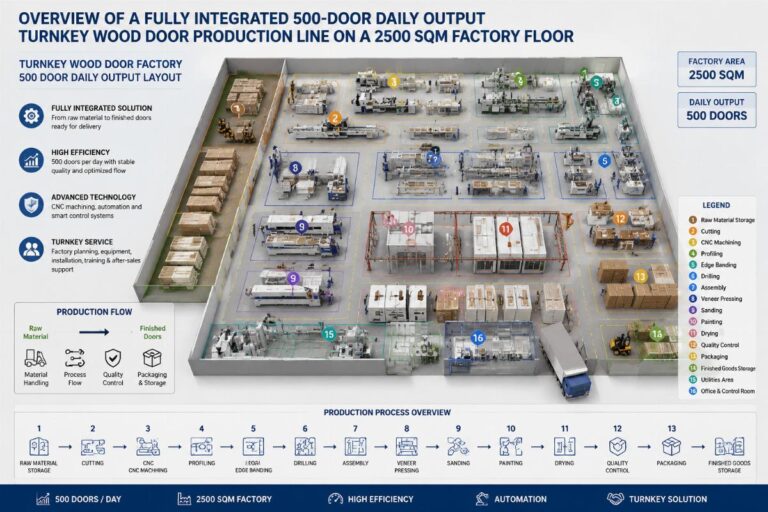
A poorly planned floor plan turns a reasonable equipment list into an inefficient, injury-prone operation. The physical arrangement of machines in a custom furniture workshop setup determines material handling distance, worker fatigue, and — critically — whether you can expand later without tearing things down.
The standard flow follows a linear or U-shaped path:
- Raw material storage → sliding table saw or CNC nesting center → edge banding → boring / drilling → assembly and packing
I have walked into shops where the edge bander was placed against the far wall, forcing workers to carry panels across the entire floor after cutting. In high-volume shops, that extra travel adds up to a substantial amount of labor time per shift. [NEED_CITE: material handling cost proportion in panel furniture manufacturing]
Beyond machine placement, there are infrastructure items that must be locked before the floor is poured:
- Foundation and leveling. Heavy cast-iron-frame machines require stable, vibration-damped flooring. Retrofitting after installation is disruptive and expensive.
- Duct routing. Dust collection ducts must be sized and routed before machines are positioned. Adding branches later reduces suction at distant points.
- Electrical drops. Overhead bus drops or floor trenches need to match machine power ratings and phase requirements. Running extension cables across a workshop floor is both a safety hazard and a productivity drag.
- Compressed air lines. Edge banders and pneumatic clamps on boring machines need clean, dry air at consistent pressure. Undersized lines cause pressure drops that trigger error stops.
A buyer in the Middle East had his workshop layout finalized before ordering equipment. When the machines arrived, the ceiling height was insufficient for the dust collection duct routing, and the electrical panel lacked capacity for the combined load. Relocating the electrical infrastructure and raising the duct runs cost a significant sum — money that would have been saved by coordinating layout with equipment specs upfront.
The rule I follow: finalize the layout drawing with machine footprints, utility requirements, and material flow paths before signing any purchase order. In a custom furniture workshop setup, the floor plan is as much a production tool as any single machine.
Which Custom Configurations Prevent Costly On-Site Surprises?
Voltage, control language, and OEM branding are not afterthoughts — they are specifications that must be locked at the order stage. I have seen buyers receive machines that were mechanically perfect but electrically or digitally incompatible with their local infrastructure. Fixing those issues on-site is always more expensive than configuring correctly at the factory.
The critical configuration items:
- Voltage and frequency adaptation. Industrial power grids vary substantially across regions. Machines must be wound and tagged for the exact voltage-frequency combination at the installation site. A mismatch can damage motor windings, trip protection circuits, or void warranties. [NEED_CITE: industrial voltage standards by region for woodworking machinery]
- PLC and HMI language. The human-machine interface must operate in the language your operators read. A panel locked in a foreign script turns routine adjustments into guesswork and increases error rates.
- OEM branding and labeling. Distributors importing for resale need factory-applied logos, custom color schemes, and localized documentation. This must be specified before production begins — not requested after the machines are packed.
- Tooling and spare-parts packages. Shipping a machine without a matched set of router bits, edge-banding trim blades, and wear components means the line sits idle while consumables are sourced locally — often at premium prices and uncertain quality.
A distributor in North Africa ordered a full container of edge banders and CNC routers for resale. Because the order was placed with clear OEM specifications — including localized voltage tags, French-language HMI, and branded enclosures — the machines went straight from the port to dealer showrooms without any rework. Contrast that with a different buyer who skipped language customization and spent weeks arranging third-party translation and re-flashing of control panels.
When I review orders for a custom furniture workshop setup, I treat the configuration sheet as seriously as the mechanical spec sheet. The machines that cause the most field problems are rarely the ones with mechanical defects — they are the ones that arrived technically correct but contextually wrong.
How to Budget a Complete Workshop Setup Without Overcommitting?
Phased investment beats overbuilding. Most successful workshops I have worked with started with a core configuration that covered their immediate product range, then added capacity as order volume justified it.
A typical phased approach:
- Phase One — Core line. CNC nesting center, semi-automatic or automatic edge bander (depending on volume), and a multi-boring machine. This combination covers the majority of panel furniture production steps.
- Phase Two — Capacity and specialization. Add a beam saw for high-volume ripping, upgrade to a PUR edge bander for moisture-resistant seams, or add a second boring station for parallel processing.
- Phase Three — Finishing and auxiliary. Wide-belt sander, vacuum press for wrapped components, automated packaging line.
Sourcing directly from a manufacturer — rather than through trading intermediaries — meaningfully reduces the capital requirement for each phase. Factory-direct pricing on a complete custom furniture workshop setup typically runs substantially below equivalent European-brand configurations, while maintaining comparable precision on core structural components. [NEED_CITE: price differential between Chinese-manufactured and European-manufactured panel furniture machinery]
Equally important is the flexibility of order structure. A manufacturer that can supply a single edge bander today and a full production line next year — with consistent OEM branding and compatible control systems — lets you scale without stranded assets.
The budgeting principle is simple: commit capital to the machines that generate revenue first, and defer the machines that generate convenience. In a custom furniture workshop setup, that means the cutting, edge-banding, and boring trio comes before the sanding, pressing, and packaging trio — every time.
Conclusion
A successful custom furniture workshop setup is engineered from the inside out — product mix and daily volume first, then machine selection, line balancing, floor planning, and configuration locking. Buyers who reverse that sequence pay for it in idle machines, on-site rework, and delayed startups. Get the workflow right before you sign the purchase order, and the machines will follow naturally.
Tags

Written by
author
Editor covering global sourcing, supplier verification, and industrial product knowledge. Content is compiled from manufacturer specifications, industry standards, and hands-on experience with international B2B buyers. Every article is fact-checked before publishing to help procurement professionals make informed decisions.
Leave a Reply